Buildroot build imags
使用buildroot构建社区系统
-
源码仓库地址 https://github.com/DongshanPI/buildroot-external-dongshanpione
-
构建步骤
编译完成后,输出的文件存放在 构建目录下的git clone https://github.com/DongshanPI/buildroot-external-dongshanpione cd buildroot-external-dongshanpione makeoutputs目录内,文件如下。接下来进行烧写操作。book@virtual-machine:~/DongshanPiOne/buildroot-external-dongshanpione/outputs$ ls -lh total 25M -rw-r--r-- 1 book book 44K Apr 1 03:20 dongshanpione-ipl -rw-r--r-- 1 book book 3.4M Apr 1 03:20 dongshanpione-kernel.fit -rw-r--r-- 1 book book 4.4M Apr 1 03:20 dongshanpione-kernel-rescue.fit -rw-r--r-- 1 book book 3.5M Apr 1 03:20 dongshanpione-rootfs.squashfs -rw-rw-r-- 1 book book 13M Apr 1 03:20 dongshanpione-ubi.img -rw-r--r-- 1 book book 465K Apr 1 03:20 dongshanpione-u-boot.img -rw-rw-r-- 1 book book 2.0K Apr 1 03:20 GCIS.bin -rw-rw-r-- 1 book book 22K Apr 1 03:20 IPL.bin
运行救援系统
1.烧写u-boot-2022
- 使用开源烧写工具 先烧写第一阶段引导程序。
- 开源社区工具更详细的说明请看;,下载安装方式也在此页面。
- 社区版烧写工具 连线介绍 https://item.taobao.com/item.htm?id=665728385852
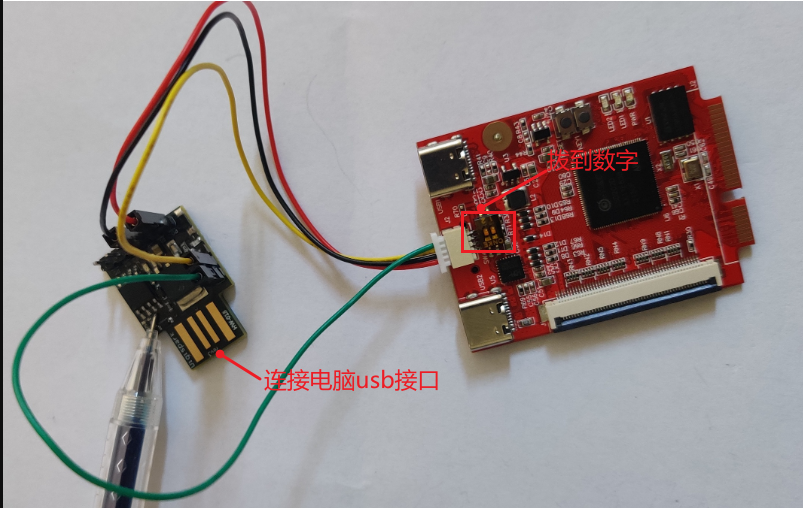
- 将烧写工具连接好烧录线后,将烧录器和开发板烧写接口连接好,拨码开关切换为烧写模式(拨码开发白色拨码切换到非NO方向)。

之后我们按下 主板上Reset键,同时执行如下烧写命令,其中第一句话sudo SNANDer -p mstarddc -c /dev/i2c-0:49 -e是整个 擦除 flash 命令,建议执行。 注意:烧写操作是在ubuntu-18烧写,需要将烧写工具挂载到ubuntu系统内,挂载成功后系统会自动装在驱动模块,此时设备管理器会多出一个/dev/i2c-0的设备节点,其中烧写命令中 -l参数指定的是烧写文件的长度(大小),如果你修改了源码大小,请确认大小是否正确。
在烧写操作之前,请确保你已经进入需要烧写镜像目录内。
注意:烧写之前或烧写时请不要打开串口工具,否则会导致烧写失败。 * 如下为详细的烧写命令,需要依次执行。
烧写完成第一部分后,请先拔下烧录器,使用镊子 调整拨码开关至sudo SNANDer -p mstarddc -c /dev/i2c-0:49 -e sudo SNANDer -p mstarddc -c /dev/i2c-0:49 -w GCIS.bin sudo SNANDer -p mstarddc -c /dev/i2c-0:49 -a 0x140000 -l 0x6000 -w IPL.bin sudo SNANDer -p mstarddc -c /dev/i2c-0:49 -a 0x200000 -l 0xB000 -w dongshanpione-iplONKE字母一侧,之后使用 Mobaxterm工具,打开串口终端,打开终端后,按下reset复位按钮,即可看到如下图所示的log启动信息。
IPL g76cd9eb
D-1e
HW Reset
miupll_233MHz
MIU0 zq=0x003b
miu_bw_set
utmi_1_init done
utmi_2_init done
utmi_3_init done
usbpll init done......
cpupll init done
SPI 54M
clk_init done
P1 USB_rterm trim=0x0000
P1 USB_HS_TX_CURRENT trim=0x0000
P2 USB_rterm trim=0x0000
P2 USB_HS_TX_CURRENT trim=0x0001
P3 USB_rterm trim=0x0000
P3 USB_HS_TX_CURRENT trim=0x0001
PM_vol_bgap trim=0x0002
GCR_SAR_DATA trim=0x0193
ETH 10T output swing trim=0x0010
ETH 100T output swing trim=0x0010
ETH RX input impedance trim=0x0000
ETH TX output impedance trim=0x0001
MIPI_HS_RTERM trim=0x0001
MIPI_LP_RTERM trim=0x0000
128MB
BIST0_0001-OK
Enable MMU and CACHE
Load IPL_CUST from SPINAND
QUAD MODE ENABLE
unable to find IDX for part type:0001
[I]m7
Checksum OK

cpuid: 410fc075, mstar chipid: f0
IPL image is broken
normal power on
wrote 1f206540 <- 4bc7 was 4bc7, readback 4bc7
wrote 1f206544 <- 0037 was 0037, readback 0037
wrote 1f206548 <- b3d5 was 0000, readback b3d5
wrote 1f20654c <- 0043 was 0000, readback 0043
wrote 1f206560 <- 0001 was 0000, readback 0001
wrote 1f206554 <- 0006 was 0006, readback 0006
wrote 1f20655c <- 0008 was 0008, readback 0008
wrote 1f206564 <- 1000 was 0000, readback 1000
wrote 1f206550 <- 0000 was 0000, readback 0000
wrote 1f206550 <- 0001 was 0000, readback 0001
wrote 1f20442c <- 0001 was 0000, readback 0001
wrote 1f203ddc <- 0004 was 0000, readback 0004
wrote 1f203dd4 <- 4004 was 0000, readback 4004
wrote 1f203dd8 <- 0001 was 0000, readback 0001
wrote 1f203dc0 <- 0000 was 0000, readback 0000
wrote 1f203dc0 <- 8000 was 0000, readback 8000
delaying for 100
readback: 4278
mplldbg 2
mpll: 0 - 0
mpll: 4 - 0
mpll: 8 - 0
mpll: c - 0
mpll: 10 - 0
Trying to boot from SPI NAND(UBI)
set speed: 100000
set mode: 0
UBI: Bad magic in block 0490 00000000
UBI: Bad magic in block 0491 00000000
UBI: Bad magic in block 0493 00000000
UBI: Bad magic in block 0746 00000000
UBI: Bad magic in block 01001 00000000
UBI: Loading VolId #0
UBI warning: LEB 0 of 1 is missing
UBI warning: Failed to load volume 0
UBI: Bad magic in block 0490 00000000
UBI: Bad magic in block 0491 00000000
UBI: Bad magic in block 0493 00000000
UBI: Bad magic in block 0746 00000000
UBI: Bad magic in block 01001 00000000
UBI: Loading VolId #0
UBI warning: LEB 0 of 1 is missing
UBI warning: Failed to load volume 0
UBI warning: Failed
Trying to boot from UART
CC
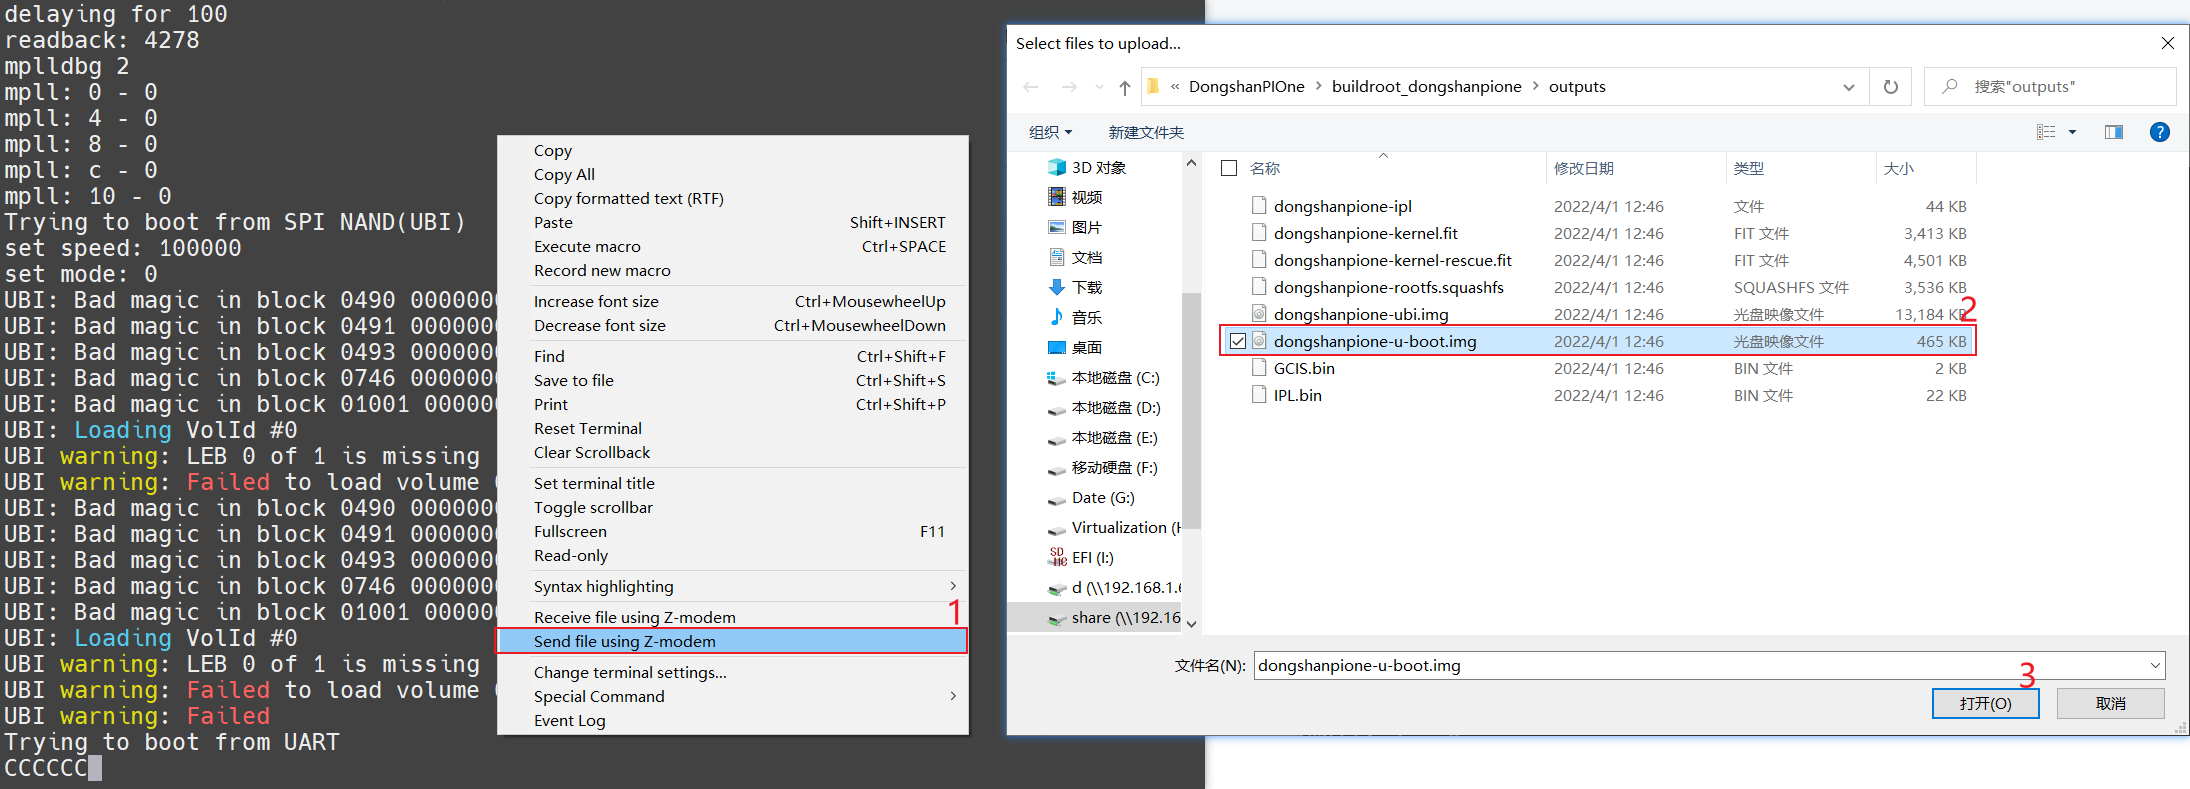
u-boot.img 也就是第二部分dongshanpione-u-boot.img发送到给 东山PI壹号的 IPL 程序,用于加载并启动进入u-boot命令行。 我们已 Mobaxterm为例,在系统启动打印 C字符串的时候,就可以参考下属操作在当前串口终端,右键 弹出菜单选项,移动到**Send file using Z-modem** 项,之后再弹出的对话框中选择要发送的 dongshanpione-u-boot.img 镜像文件,等待发送完成即可,如下图所示。 
Transfer complete
Loaded 475852 bytes


U-Boot 2022.04-rc2 (Mar 08 2022 - 22:03:20 +0000)

DRAM:  128 MiB
wrote 1f206540 <- 4bc7 was 4bc7, readback 4bc7
wrote 1f206544 <- 0037 was 0037, readback 0037
wrote 1f206548 <- b3d5 was b3d5, readback b3d5
wrote 1f20654c <- 0043 was 0043, readback 0043
wrote 1f206560 <- 0001 was 0001, readback 0001
wrote 1f206554 <- 0006 was 0006, readback 0006
wrote 1f20655c <- 0008 was 0008, readback 0008
wrote 1f206564 <- 1000 was 1000, readback 1000
wrote 1f206550 <- 0000 was 0001, readback 0000
wrote 1f206550 <- 0001 was 0000, readback 0001
wrote 1f20442c <- 0001 was 0001, readback 0001
wrote 1f203ddc <- 0004 was 0004, readback 0004
wrote 1f203dd4 <- 4004 was 4004, readback 4004
wrote 1f203dd8 <- 0001 was 0001, readback 0001
wrote 1f203dc0 <- 0000 was 8000, readback 0000
wrote 1f203dc0 <- 8000 was 0000, readback 8000
delaying for 100
readback: 4277
mpll here!
mpll here xxxx!
checking 26f84528 26f84528
found parent at 0
mpll is already running
Core:  43 devices, 16 uclasses, devicetree: fit
WDT:   Started watchdog@6000 with servicing (60s timeout)
MMC:   MSC: 0
Loading Environment from UBI... set speed: 100000
set mode: 0
Volume env not found!

** Unable to read env from UBI:env **
In:    uart@221000
Out:   uart@221000
Err:   uart@221000
Net:   mstar pinctrl g 0, f 0
found selector
checking 26f85630 26f85630
found parent at 0
emac patches
rx ring 26fcdb40
eth0: emac@2a2000
Hit any key to stop autoboot:  0
Volume kernel not found!
Wrong Image Format for bootm command
ERROR: can't get kernel image!
=>
进入以后,我们就可以接下来先运行 最小的 Linux 救援系统,进入系统后 把各个部分镜像 烧写到nand flash内。
2.运行内核系统
接下来 我们需要通过网络tftp加载运行内核,或者通过串口下载并运行内核。
使用网络tftp方式下载(推荐)
- 首先我们需要先配置好 ubuntu系统的tftp 服务,并将我们之前编译好的
dongshanpione-kernel-rescue.fit文件拷贝到配置好的 tftp 目录下,之后请记住,您的ubuntu host主机IP地址,参考下属命令运行,如下示例所示,我们的 存放 kernel镜像的 ubuntu tftp服务器主机 IP地址是 192.168.1.133 ,你需要根据你的情况进行修改。
=> setenv loadaddr 0x22000000; dhcp 192.168.1.133:dongshanpione-kernel-rescue.fit;bootm 0x22000000#ssd202d-dongshanpione
执行完成后,它会自动从ubuntu的tftp目录下下载你的内核镜像文件,然后启动,类似如下打印消息输出
emac@2a2000: PHY present at 0
PHY reset timed out
phy power up
Doing phy power up
emac@2a2000: Starting autonegotiation...
emac@2a2000: Autonegotiation complete
emac@2a2000: link up, 100Mbps full-duplex (lpa: 0xcde1)
BOOTP broadcast 1
BOOTP broadcast 2
BOOTP broadcast 3
DHCP client bound to address 192.168.1.53 (793 ms)
Using emac@2a2000 device
TFTP from server 192.168.1.133; our IP address is 192.168.1.53
Filename 'dongshanpione-kernel-rescue.fit'.
Load address: 0x22000000
Loading: #################################################################
         #################################################################
         #################################################################
         #################################################################
         ######################################################
         3.4 MiB/s
done
Bytes transferred = 4607292 (464d3c hex)
## Loading kernel from FIT Image at 22000000 ...
   Using 'ssd202d-dongshanpione' configuration
   Trying 'kernel-0' kernel subimage
     Description:  unavailable
     Type:         Kernel Image
     Compression:  uncompressed
     Data Start:   0x220000a4
     Data Size:    3403824 Bytes = 3.2 MiB
     Architecture: ARM
     OS:           Linux
     Load Address: 0x21800000
     Entry Point:  0x21800000
     Hash algo:    crc32
     Hash value:   dc0ebb3a
     Hash algo:    sha1
     Hash value:   881943efc7cf947392bffd3ae624733f2507bd35
   Verifying Hash Integrity ... crc32+ sha1+ OK
## Loading ramdisk from FIT Image at 22000000 ...
   Using 'ssd202d-dongshanpione' configuration
   Trying 'ramdisk-0' ramdisk subimage
     Description:  unavailable
     Type:         RAMDisk Image
     Compression:  uncompressed
     Data Start:   0x2234c650
     Data Size:    1147180 Bytes = 1.1 MiB
     Architecture: ARM
     OS:           Linux
     Load Address: unavailable
     Entry Point:  unavailable
     Hash algo:    crc32
     Hash value:   c40c3d1c
     Hash algo:    sha1
     Hash value:   702d8f01c746bdfbfcaebd4572b95ecf32e3bf7c
   Verifying Hash Integrity ... crc32+ sha1+ OK
## Loading fdt from FIT Image at 22000000 ...
   Using 'ssd202d-dongshanpione' configuration
   Trying 'fdt-1' fdt subimage
     Description:  unavailable
     Type:         Flat Device Tree
     Compression:  uncompressed
     Data Start:   0x22345c04
     Data Size:    27001 Bytes = 26.4 KiB
     Architecture: ARM
     Hash algo:    crc32
     Hash value:   4ed1ac67
     Hash algo:    sha1
     Hash value:   6209734a29f8a3c9f2ba1329135358d6bbda62d4
   Verifying Hash Integrity ... crc32+ sha1+ OK
   Booting using the fdt blob at 0x22345c04
   Loading Kernel Image
   Loading Ramdisk to 26e64000, end 26f7c12c ... OK
   Loading Device Tree to 26e5a000, end 26e63978 ... OK

Starting kernel ...

[    0.000000] Booting Linux on physical CPU 0x0
[    0.000000] Linux version 5.17.0 (buildroot@buildroot) (arm-buildroot-linux-musleabihf-gcc.br_real (Buildroot 2022.02-349-g1506ff275b) 11.2.0, GNU ld (GNU Binutils) 2.37) #1 SMP Mon Mar 28 12:29:22 UTC 2022
root进入系统。 使用串口协议发送
- 对于没有网络或者环境不方便的同学,可以在u-boot下使用 串口协议进行传输 kernel 镜像,此方法传输非常慢,不建议使用。 我们只需要在 u-boot 命令行下输入如下命令,之后将次串口终端断开,重新创建一个 波特率 为 460800 的串口终端,之后 根据提示 使用 Z-modem 命令进行传输文件。
传输完成后,根据提示,断开当前 串口终端,之后切换回原来的 115200 波特率终端,按下 键盘 ESC键,即可自动加载启动系统。 启动信息 类似上述logo。
3.烧写系统至flash
根据上述操作 我们已经进入到 kernel的救援系统内,之后继续进行如下操作将我们编译好的系统镜像烧录至板载的 Nandflash 芯片内。
1.格式化创建分区
- 如下命令所示,需要首先格式化Nandflash 并创建各个部分的镜像分区。
2.拷贝并烧写
- 我们可以使用nfs网络挂载的方式,进行拷贝烧写这些文件。
1.烧写救援系统
-
烧写u-boot镜像
-
烧写救援kernel镜像
烧写完成后,重新复位,进入uboot命令行,执行如下命令设置启动参数,即可自动从刚才烧写好的分区加载救援系统镜像并启动。
2.烧写内核和根文件系统
-
烧写正常的kernel镜像文件
-
烧写根文件系统
-
在uboot下设置启动参数,并保存到env内,之后我们就可以无需任何操作 完整的从系统启动了。